Tips Blog
12/2017 - TIP - MERRY CHRISTMAS!
Yes, I said MERRY CHRISTMAS, LOL! And that's about all I'm going to say this month, as I've decided we're all too busy at this time of year to learn anything, LOL.
So just a quick note to wish you all the best for the holiday season, and here's hoping 2018 is full of all the wonderful things you dream, and work for! Lots of changes - both definite and possible - coming for us in the new year, so check out our WAS'SUP and newsletter, to keep in the know! Talk to you next year...
11/2017 - TIP - PAPER EMBROIDERY
Since I recently released a new design on PAPER EMBROIDERY, I thought I'd spend this blog giving you a "brief history and how-to" on this interesting technique! Paper piercing has been around since the 1700's, though originally designs were created by making larger and smaller holes, with actual stitching being added later. In the 1970's Pierre Bezier set out to prove you could make a curve using a series of straight lines, and to teach this theory, school teachers invented string art!! While you can use almost any type of embroidery stitch on paper, the style that has me most intrigued is that influenced by string art!
OK, so that's your history... now for some how-to! I print my templates (or patterns) right on the back of the cardstock I want to use for my stitching, and will have kits available before Christmas, if you're thinking of a stocking stuffer (wink). However, you can also purchase reusable templates, or download them off the internet and print them on regular paper.
If you're using paper, lightly tape the template in position on the back of the cardstock, so it DN shift as you punch. Lay the cardstock face down on a piercing pad - you can purchase a pad, or use an old mouse pad or piece of cork - I use 3 layers of felt, on a clipboard, so it is both cushioned and mobile!
When you begin piercing, hold the tool as upright as possible, and pierce at each dot on the template as accurately as possible. Again, you can buy a piercing tool, or you can use a long needle (though I found that very hard on the hand). We made our own tools by inserting a fine needle (like a #26 tapestry needle) in the end of a small length of dowel! Hold the cardstock up to the light from time to time, to check that all holes have been pierced. BE SURE ALL THE HOLES ARE DONE BEFORE YOU REMOVE THE TEMPLATE!
Note that most patterns for paper embroidery are small - card or ornament sized - because you can't clean and press the paper once you're finished, so the background has to be kept as clean and undamaged as possible!
Because the patterns are small, one strand of embroidery floss is often enough - though you may want to play with the look of various numbers of strands, to make a particular design pop! There are no knots on the back of the work, tails are fastened in place with tiny pieces of scotch tape! Since you're using a heavy paper to stitch, the thread won't show through, so try to anchor outside the stitching area as much as possible.
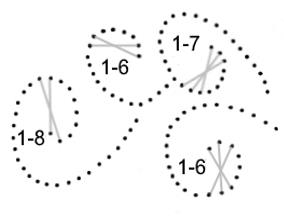
Stitching instructions are generally provided in cryptic notes, such as 1-6. This means come up in the first hole, then count six holes from the starting point (NOT including the starting hole), and that is where you go down to the back of the cardstock, and that is how long each stitch on that particular motif will be. If there is a mirror image motif (that DN have instructions), it is stitched the same way (or reversed). If you're working on an open curve, start at one end. If you're working on a closed motif, and a starting position is not indicated, then you can start anywhere on the circle, but work all the way around. You will often find that every hole maybe used twice (on a closed motif), or that some holes .
Let me give you a little diagram to follow, to make the next part easier (wink). The diagram (below) has a stitch length of 1-11, and is being worked clockwise. This means we started at the top (1), and counted 11 holes clockwise, before going to the back of the cardstock, and all the stitches will be this length. However, unlike say Satin Stitch, we are not going to go back to the starting position, instead we will continue to the NEXT HOLE clockwise (3), then cross the motif on the face of the cardstock, to go down in the NEXT HOLE clockwise (4) from our starting position (1).
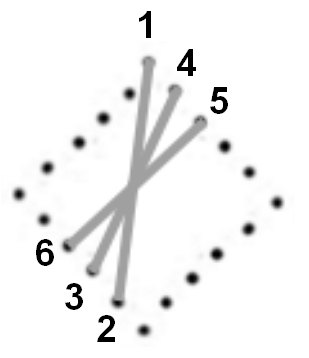
We'll continue in this manner, moving one hole clockwise from where we went down (at 4), to come up (at 5), and we'll move clockwise to the next hole (6) from the last stitch on the opposite side (3), to go back down. We'll keep stitching in this way all the way around the motif. By the time we reach the bottom hole of the diamond, holes (1) and (4) will have to be used a second time, so the design may call for you to continue around until EVERY hole has been used twice, before stopping. (Just a designing note, in case you want to make your own template... a pattern with 2 less holes on the left side of the diamond would end with the final bottom stitch in that last unused hole before (1)!).
So when you look at the back of your stitching, there is a bare minimum of thread - it's all on the front! Also remember that the template on the back is a mirror image of the face of the stitching, so if you want the stitching to go clockwise, you have to count COUNTER-clockwise on the back!
One final tip... if you run out of floss and are adding a new strand by end on the back and starting the new strand in the next hole, wait and tape the ending tail down at the SAME TIME as your new starting tail, to keep the amount of tape on the back to a minimum.
Here's a wee pattern for you to try out. Print the template so it's about 2" high. The different stitch lengths will let you see how the length affects the look of the stitching. And if you enjoy this new technique, watch for additional designs coming soon!
10/2017 TIP - BACK TO BASICS!
As I'm teaching and talking with stitchers, I am always surprised by the number of little tips that are new to even the most experienced stitchers... even me! I am always on the lookout for a new technique or trick - which is how I learned about modified 3/4 stitches, loop starts, and have started paper embroidery recently (wait for a new chart next month)! Even after all these years, there's always something new to learn.
So this month I thought that I would take a moment to explain a few of the 'basics', and come of the "why's" behind them.
First of all, before you even begin stitching consider your materials. For example, is your fabric large enough to allow for framing or finishing? Since dyes can vary from dye lot to dye lot, have you purchased enough floss to complete the project - better to be generous than sorry! Have you chosen a project you will enjoy stitching, which isn't too difficult for your skill level, even if it provides a slight challenge to increase that level?
Make a 'working copy' of the pattern - most designers do not mind this, as long as all copies are destroyed once the project is stitched. A copy allows you to mark off each row, or section, as it is stitched, so you always know where you are working. Another good idea is to put a marking pin, safety pin, or small piece of floss to designate the TOP of the stitching until enough is completed that you can see which way is up <wink>. This can be especially important if you are working on something like a topper or tree skirt, where you work around a circle (and especially if the design has a repeat in it!). You want to keep the fabric in the same position and turn the pattern (if necessary for a repeat), so that your stitching faces the same way down the entire piece. If you turn the fabric - trust me - it will look horrible!
OK, so now you're ready to stitch, if you're not familiar with LOOP STARTS, look for my 07/2017 TIP BLOG covering that ... for now, just let me say that it is very important to make sure all tails (both beginning and ending) are well secured, or they will come loose - and generally show through after the piece is framed, which is VERY annoying! If the item will get some wear - like a topper or tree skirt, then I suggest running the tail in 2 directions. In any case, be sure all tails run AWAY from the edge of the stitching (or open areas), so they don't show through the fabric.
NEVER carry floss across unstitched areas of the design - it WILL show!
Some stitchers cut their fabric with a 3" allowance on each side and begin stitching 1.5" in and down from a corner, but if you begin in the centre of your pattern, and the centre of your fabric, then the finished stitching will always be centred, allowing an equal fabric allowance all the way around!
Be sure to wash your hands before starting, keep pets away from your work (as much as possible), and remove the hoop after each stitching session. All of these things will help keep the fabric clean. Once the project is finished, wash in mild dish soap and cool-to-warm water, and rinse well. To dry, place face down on a clean towel and press from the back with a hot dry iron. Lift the iron and move it around the stitching until the fabric and floss are fairly dry. Pressing from the back, and using a towel, allows the stitching to raise off the fabric and become more prominent. I generally leave the piece sit overnight after pressing, to be sure it's completely dry before mounting and framing.
Let's talk for a bit about floss. There are so many kinds! Shiny, fuzzy, over-dyed... some of which require delicate handling. Sometimes the best thing is to use shorter lengths, or different techniques. For example, when working with either fuzzy floss or over-dyed floss, you will want to complete both legs of each stitch as you work across the row. In the case of fuzzy floss, you do this because it's furry, and it can be hard to see where you want to stitch on the way back across the row. Using the same technique (working both legs of each stitch) with over-dyed floss allows the color changes to flow through the design. I do a whole lesson on working with over-dyed floss, LOL, and the various looks you can get, and the difference between over-dyed and variegated so maybe we'll get into that next month...
Well, I think that may be enough info for one day, <GBG> - let me know if you think of any other tidbits like this that you think I should share - there's a free LITTLE LEAFLET for you if you come up with something no one else has shared yet.
Happy Stitching!
09/2017 TIP - VANDYKE STITCH
I like to learn new things... and today I learned a new-to-me stitch, called a VANDYKE STITCH, so I thought I'd share this new knowledge with you, LOL.
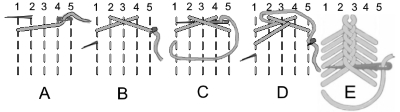
This is a braided stitch, most commonly used for edging, and can be worked free hand. However, being an avid cross-stitcher, I prefer to work on Aida to learn it, so that I can use the grid of the fabric to keep my braided band straight, and even. Begin by selecting your width spacing, and divide the space evenly into 5 sections. Either pretend your width is divided into 5 columns, or actually draw the spacing with a fabric marker designed to wash out or fade away. I have numbered these lines on the example below (and indicated the line spacing with dash marks), so you understand each step easily (for example, the first leg of the stitch goes up 1 stitch, from the bottom of line 1, across lines 2-3, to the top of line 4).
There are FOUR steps to this stitch (labelled A-D on the drawing below), which is worked from the top of the band, down:
STEP A: Begin at the bottom of the desired stitch width, on the first 'line'. In this instance, we are going to work 1 stitch high (and 5 wide), so begin at the top of the band to be stitched, on the far left 'line', down 1 stitch - come up from the back of the fabric at this point (see A below). Using a sewing motion, insert your needle at the top of the stitch, on 'line' 4. As mentioned above, in this example, that means counting 3 'lines' to the right (from your starting position), then up 1 stitch. The needle goes down at 4, then left 2 stitches and up at 'ine' 2, in the scooping motion shown (see A below). TIP: be sure you're using a needle that is long enough to reach across all 5 stitches!
STEP B: Cross the stitch you just made (carrying the thread to the right), moving down one space, and over to 'line' 5, to insert the tip of the needle. The right side of the stitch should be level with the starting position on the left side of the stitch. If you're stitching free-hand, move down the height of the stitch you just made (in this example 1 stitch on the Aida), and bring the needle back to the front of the fabric at this point - all the way across the width of the stitch (see B, below). This will form an X with a wide bottom and narrow top, and your floss will be at the starting position for the NEXT stitch.
STEP C: This is where you start making the braid! Feed the needle UNDER the cross-over of the X you just made, being very careful not to catch any fabric, or any of the previous stitching (see C below). TIP: use a blunt tipped Tapestry needle, to avoid splitting any of the threads.
Just a note at this point, about the importance of keeping your tension even, so the centre braid is tidy.
STEP D: To finish the stitch, and form the braid, move straight across to 'line' 5, so you are once again even with the bottom of this stitch, and repeat Step B. Repeat C and D down the band, and the braid will form, looking something like E (below).
Notice how the needle continues to go under the stitches as you work - but NEVER catches any fabric or previous stitching in this pass-through. Give this lovely stitch a try, and see how you like it!
08/2017 TIP - STREEETTTCCCHHH
So you've probably noticed that, as much as you love stitching, sometimes when you're done and try to get up.... you can't! Everything hurts, won't move, or both! While some of this may be due to age or physical conditioning, a lot of it can be eased by simply moving more often.
Here are a few tips and suggestions to get you started....
First of all SIT PROPERLY! Use a small pillow or other support at your back, if your chair DN have a built in support. If you're short (like me), try a small stool to raise your feet off the floor, so your legs are bent at 90 degrees, and the circulation isn't cut off by furniture digging into the backs of your thighs or knees.
Make sure your light is adjusted so that it shines where you are working, without you leaning over to see better. Same for a magnifier (even the great one we carry) - always move the light / magnifier to YOU, don't you move to them.
Now that you're comfortable - get up, LOL. Every hour (at least), stand up and stretch. I know you only have a few more stitches to do to finish that section (wink), but they'll still be there after you stretch, so get up when the time is up, not when you're done stitching!
Here are some ways to remind yourself it's time to move:
- If you watch TV while you stitch, use that as a timer. Whenever the program changes, you change position. Just remember if you're watching a movie, or something quite long, to use a commercial break about half-way through to do your stretching.
- If you listen to the radio while you stitch, listen for the news (on the hour), or the time announcement, and get up every hour or so. If you listen to music, stretch every time you get up to change the CD.
- Or do what I do, and get a kitchen timer. Set it for an hour, and when it goes off, get up!
Be sure to take any physical ailments you might have into consideration, and ask your doctor for stretches that might be safer for you... but here are a few stretches that I use that are as easy as 1-2-3:
ONE: Stand up with your feet slightly apart, and stretch your arms over your head, holding one wrist, then the other, as you SLIGHTLY turn and lean forward to stretch your back muscles. Keep your arms in front of your ears, and do not lean back.
TWO: With your arms hanging loosely by your sides, relax your shoulders and gently circle your head, or slowly tilt your head side to side (ears towards your shoulders) - SLOWLY and GENTLY are the key words here, you don't want to pull any muscles!
THREE: I find that I can ease my hands by stretching them as wide as I can for the count of 10, then making a fist for the count of 10 (not a tight fist, more of a folded fist, you don't want to add stress or pain, you're trying to remove it). Repeat this 3-5 times, depending on how stiff your hands are. FYI, this also works great first thing in the morning, if you're like me and have some stiffness in your fingers when you wake up.
Funnily enough, it's the wide stretch that seems to do the most good, rather than the closed fist. I have also read of this exercise being done by stretching, then folding your fingers half-way down (to the top of your palm), then stretching and folding your fingers down to the bottom of your palm (do not make a fist). Try both ways and see which works best for you. I have one finger that won't bend (no pain, fortunately), but a slight curl is the best it will do... these hand stretches really help.
And I hope this helps you... disclaimer time - I am not a doctor... these are just some things I have found that helped me over the years. As I mentioned earlier, if you have any physical issues check with your doctor before trying these. Do them slowly and gently, and stop at the first sign of discomfort... and happy stitching!